D.i.y Pom Pom bookmarks


Lately I've been super stoked about returning to school in the Spring. Mostly because it'll be my last semester before I graduate! But I also love school supply shopping and preparing for the first day of school. Nothings better then a new set of pens, notebooks, or a backpack. I hate that all my school books are all starting to blend in, so I figured a pom pom organization system is the best way to go. Each color goes with a certain subject, making it easy to find in a messy backpack. This'll probably make me want to read through my books too! These of course are perfect for regular non-school actually interesting books. 

Supplies
#1. White elastic 
#2. Sharp scissors 
#3. Your favorite yarn
#4. Needle & white thread (Not shown).
#5. Book 
#6. 15 minutes of your time.


Step one: Wrap the yarn around two fingers. The more times you go around the bigger your pom will be. I went about 50x, basically till my fingers turned blue.


 Step two: Cut a long piece of yarn and pass it through your fingers. Once the yarn is facing your palm,  try and make a secure tie, If you have a helping hand lying around go get him or her to do this for you (Not necessary, just convenient ).


Step three: This is what your pom pom should look like. It is tightly knotted where my fingers were, and looks like the cutest bun! 


Step four: Place your scissors inside of folded portion, and cut it up. Your pom should then look like the photo below, one terrible hair cut.


Step five: Now it's time to make your pom actually look like a pom pom. Even out all of the strings, and smooth it out as much as possible. Remember not to cut the long thread you used to tie your pom. You will need it later on.


Now its time for the elastic portion!


Step six: Wrap the white elastic around your book making sure its as stretched out as possible. Once you snip the elastic, you will then sew the two cut pieces together. I hand sewed mine vertically. 


Step seven: Tie your pom pom onto the sewn portion of the elastic. This way your hiding the stitch your made! Which means you can do a crappy job. Once you make a secure knot onto the elastic, cut off the two long threads to the size of the other threads. Place in book and your good to go!


Or try it out with your school books! Also don't forget to enter my giveaway it ends this friday!


Cheers!
 Instagram & RSS


Friday fingers + Giveaway // Polka dot fuzz


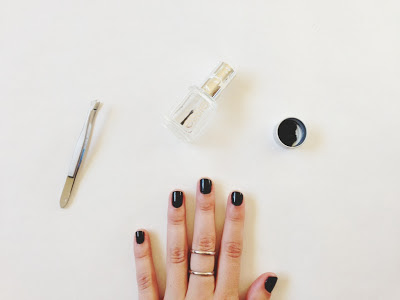
I don't think I'll ever get tired of polka dots. They're so simple and harmless, how could anybody not be pro polka. They are my go to when I'm in a hurry, just so they're not too bare.  Last week I ordered some black fuzzzz, but I'm still searching for dark crushed velvets just because they're easier to maintain. My top searches are navy and dark burgundy. I can just imagine how rad they'd look. But for now I'll be having fun with what I got & i'll be sharing with some of you! Down low is a giveaway for two winners to get some fuzz as well as a chance to become a free sponsor for 2 months!

Supplies

#1. Black nail polish
#2. Top coat
#3. Tweezers
#4. Black crushed velvet 
#5. 30 mins of your time


Step one: Paint your nails black, then apply top your top coat.


Step two: Make sure that your nails are 100% dry in order to continue onto this step. If so get your tweezers, top coat, and fuzz ready. Pour some onto a surface or small container.


Step three: Add a nice round drop of top coat onto your already coated nails. From here on your going to have to work semi fast, just so that fuzz'll stick nice and smooth. Once you apply the droplet, grab your tweezers and pick some fuzz up to apply onto your nail. Once the fuzz is on top, gentle dab it down, let it sit for 10 seconds or so. Then you can blow the residual fuzz off.

 You can either do one droplet at a time (Which is what I did for the first 4 nails or so) or if your confident enough you can apply all the droplets you want onto one nail. Then follow the same process of gentle dabbing.


I decided to go bigger with my polkas then I usually do, just because it would make the fuzz more apparent but I also mixed and matched (Added some small fuzzy balls on there). I'm really glad with the way they came out, but I've never realized how pale winter has left me! I'm going to have to cook out in the sun one of these days, Im as tan as a new born.


Enter the raffle below to get your own set of fuzz as well as two months of free sponsor space located on the right. Happy friday!


a Rafflecopter giveaway


Cheers!
 Instagram & RSS

A few lovely jar links


I absolutely jars. They make anything simply better! The best part is they are affordable & there are so many things that can be done with them. Here are a few links that I've kept my eye on & hope to eventually do. Please share if you have some too!

#1. Sweet fabric lite jars.
#2. Handy super dandy mason matches.
#3. All in one sewing kit.
#4. Pumping soap in a jar.
#5. Simple melted jar candles.
#6. Glittered bottoms.
#7. Organize your herbs dis way.
#8. Explosive smores cake.
#9. Sippin your jar.

Cheers!
 Instagram & RSS

A knotty Valentines day card


I'm aware Valentines day is a month away but I just cant help & get a head start. Especially when I figured out a way to incorporate this save the date card that I've been eying. The timing couldn't have been more perfect. This would even be perfect as an anniversary card! Anything romantic really.


Supplies

1. My PDF printable 
2. Scissors 
3. 9 inches of twine 
4. Exacto or cutting tool
5. Glue stick
5. 15 minutes of your time


Step one: After cutting out the PDF and carefully folding it in half, make a hole through the two sheets using your cutting tool. After doing so glue the two sheets together.


Step two: Place the twine through and make a knot. 


Step three: Before doing the same to the other side, make a loose knot in the middle of the card.


Make sure when you give your card to your valentine that the knot in the middle is loose. That way when they open it up it will form the knot. Click on the download bar below to make your own!


Cheers!
 Instagram & RSS


D.i.y Balloon on a stick


I've never really cared for those tiny silver balloon sticks that you buy at the market. Its probably because I like the way plastic balloons look. So I thought I would do a mixture of those balloons topped off with some ribbon. While shopping for balloons I ran into these fun smiley faced ones that I imagined would work perfectly for a birthday or to simply cheer someone up. So I grabbed a pack and got to work. Im warning you right now, this not the last time you'll be seeing these. My mind is overflowing with ideas on the different combinations that can be done.

Supplies

#1. Balloon
#2. Dowel 
#3. Two to three ribbons to mix and max
#4. Fifteen minutes of your time


Step one: Blow your balloon & knot it up!


Step two: Pick your ribbon! I stuck with a two color combo and made them long enough so that I could make a knot with the middle, rather than the ends.


Step three: In order to gain control of my balloon, I decided to tape it to the dowel. Don't worry it'll be covered once you add the ribbon around it.


Step four: Tie the ribbon tight so that the balloon stand up nice & tall. I absolutely loved the way it looked once it was done, it was fun and definitely a quick surprise to give to a friend. 


Cheers!
 Instagram & RSS


A free weekly printable plan!


Hello all & Happy new year! Sorry for my absence this week, I was in the beautiful San Francisco helping my best friend move. Some of you already knew that, via instagram. Any who I hope all of your festivities were fantastic! As for me its time to start the year off productively. I decided to try something new this year. I have no idea why but every year when I start a new planner I quit half way, seriously it never fails. This year to avoid that, I'm going to print out a months worth of my weekly planner pages. Im hoping it will motivate me to accomplish more of my bucketlist items. Last year I started a five year bucketlist & have accomplished 7 of 30. Nothing crazy, but its something. I figured if I gave myself a reasonable time frame I would get more done and be motivated, rather than making it a list before I die. Below is a download to my pdf that I hope you will all enjoy! & down lower is a list of my completed goals as well as those I hope to knock out!


Read More >>

Related Posts Plugin for WordPress, Blogger...
Back to Top
Pin It button on image hover