beauty

DIY peanut eye mask


I couldn't have chosen a better post to write about while still laying in bed. These rainy gloomy days make me the laziest ever, and I'm completely fine with that. I can't stop thinking about summer, not because the days will long and everybody goes outside to play. But really just because summer means I don't have school & I can be lazy to my fullest potential. So that's the story behind my lazy mask, why its a peanut? Well don't face masks look like peanuts already? Let them just be!


#1. Beige felt
#2. Black thread
#3. Mustard thread 
#4. Scissors
#5. Elastic
#6. Needle (Not shown)
#7. 30 minutes of your time


Step one: Cut the felt into a peanut shaped eye mask. Very similar to DSMeeBee's bridal eye mask template!


Step two: With a fabric marker or pencil, draw the lines going horizontally and vertically. This will make the sewing so much more do-able which by the way will be done in the orange thread.


Step three: Add some sleeping eyes to your nut! Then cut off all those loose dangly ends.


Step four: Place the elastic around your head to measure the right size. Then cut an Inch or so smaller so that it'll fit you nice and snug. Sew the ends to your nutty mask & done! 

Forever Lazy!
 Instagram // RSS


D.i.y Lemony lip scrub


Winters almost here & I'm stoked because I love everything about it, but I really could do without the chapped/cracked lips. Don't even think about cracking a smile, cause they literally will. So rather than buying myself a lip scrub I decided to make it. I love the way organic products feel, perhaps its the fact that I made it at home, but I really do feel a difference than store bought. Not only that but they are so simple to make at home. If you have a kitchen then you'll have the ingredients. 


Supplies

#1. A small container. 
I used a leftover product container.
#2. 1/4th tsp of Lemon or lime
#3. 3 tsp of white sugar or brown sugar 
#4. 3 tsp Unfiltered/Raw honey
#4. 1/4th tsp olive oil
#5. 15 minutes of your time

Step one: Add your honey and Suga. I used a chopstick to mix the ingredients because seeing as I am a klutz this is the safest alternative for me. In other words no mess. 


Step two: Now add the olive oil and lemon juice. If you find the lip scrub to be a little bit to liquidy, you can always add more sugar. 


When you apply this delicious edible lip scrub you will move your finger in a circular motion for about 1-2 minutes. You could either wipe it off with a damp washcloth or eat it all up. Remember that Keeping this lip scrub in the fridge will make it last longer (about two weeks). There you have it a lip scrub to fight against those nasty chapped lips.

Cheers!
 Instagram & RSS


D.I.Y Honey face mask


Lately I've been completely obsessed with natural products, home remedies, and really anything organic. Im that person that has tried everything and saw little or really no results. But since I've changed my face regimen its really improved my crappy skin. When it comes down to face masks this is my go to! Super easy and perfect for those still undergoing puberty (pimples). Seriously, when does it end? Also please, before you try this mask make sure that your skin isn't allergic to honey. 
Alright! Its time to get au-naturel. 


Supplies:

#1. Container for your mask

#2. One teaspoon of Nutmeg


#3. One teaspoon of Cinnamon


#4. Two tablespoon of Unfiltered/Raw honey


Things you should know:
- You can use the face mask 2-3 times a week.
-You get better results when applying on after a shower.
- Wear a shirt you don't care dirtying 


Step one: Pour honey into container


Step two: Add nutmeg and cinnamon


Step three: Stir  all of the ingredients until it has gone from chalky to gooey.
 I personally like using a chopstick for this step. I find that whenever I use a spoon
 I make a bigger mess.


Step four: You dont even have to wait! You can use it this second. Make sure that
 you apply the mask to a clean and patient face because you will be leaving this 
mask on for 30 minutes. I love applying this right before i shower. It saves me time
 having to wash it off over the sink, and then have to clean the sink.

Cheers!

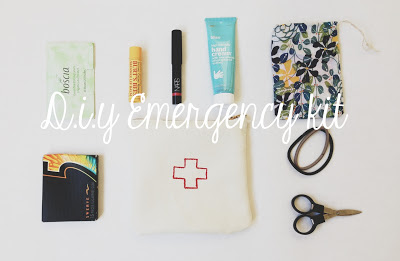
D.i.y emergency kit


Im the type of person that likes to have everything with me, you know... just in case. But throwing everything into my purse isn't very practical, especially when I need it. Everything just gets lost in the mess and I end up having to jiggle my junk out (I hope that made somebody giggle). In other words, complete waste of time. So I decided to make an emergency kit for my personal belongings. 

In my kit I carry
1.Boscia blotting wipes, which is a quick fix to an oily face.
2. Burt's bee's Chapstick
3. NARS new lover lip pencil, to give me a nice reddish hue on the go.
4. Bliss hand cream, which smells absolutely lovely! 
5. A small drawstring bag which I carry my ahem things.. girly things. 
Which I must say is the reason I have an emergency kit to begin with.
6. Some gum, which is always a must.
7. Two hair ties for a quick bun.
8. A small pair of portable scissors. As weird as it is to carry these around, 
you will not regret it. Or at least I don't. I find myself needing scissors quite 
often when im not home.


Supplies:


#1. Two pieces of canvas cut the the size you'd like your kit to be.
 Remember to add 1/2 extra on each side (seam allowance)

#2. Pins to hold fabric in place

#3. One zipper that measures the size of your pouch.
 I made mine according to the size of the zipper.

#4. Red fabric paint

#5. Fabric pen. Totally optional, I use it because
it makes my life easier.

#6. scissors

Step one: Paint your red cross on your already cut piece of canvas.
 Now its time to play the waiting game. Continue onto step two when dry.


Step two: Pin the fabric down to the zipper and
 hand sew, or use the sewing machine. 

Step three: Place the two fabrics together and sew the sides and bottom.
 Make sure your pattern is sandwiched between the two fabrics. In other 
words the part you want to be outside should be inside when sewing.

Step four: Reverse your already sewed pouch


Step five: Stuff it with your belongings! 

Related Posts Plugin for WordPress, Blogger...
Back to Top
Pin It button on image hover