D.I.Y Fabric notebooks


I dont know about you, but I've always had a love for school supplies. Doesnt matter the time of the year, a new notebook or set of new inky pens just makes me the happiest. But what to do with those old left over notebooks? The old ones that have lost its shine. Well, make them brand new again!


supplies:

#1. Old composition notebook


#2. Fabric. This is the perfect time to use any

left overs you have laying around

#3. Scissors


#4. Spray glue


Step one: Trim the side of the fabric you are going to use.


Step two: This is were things get messy. Spray the notebook with spray glue

but make sure you don't get it on the black portion of your notebook (black tape).
In other words only spray the pattern of the notebook.


Step three: Your going to want to work fast. Start by making sure the fabric is aligned

with the border of the notebook (black tape that holds it together). Then smooth out
the rest of the notebook, making sure all the wrinkles are pressed out.

Step four: Now that the fabric is attached to the notebook, its time to cut off the

fabric. What you need to do here is trace along the sides of the notebook.


Step five: Do the same to the other side. Wait for it to dry, and voila
you've got yourself a brand new notebook!

Cheers!


A few photos of October

Goodbye October. Thanks for being so darn good to me.
Here are some photos from my Instagram this month.
take a peek maybe we can be friends?


Halloween costume #1. KISS' star child
Halloween costume #2. Trent & Daria
Swinging carousel
Street adventures with the boy
Skating with the boy
That moment when your shirt is the same color as everything behind you
Borris my pup


Cheers!
 Follow my blog with Bloglovin

Pumpkin Vase


This Halloween I didnt have enough time to do any pumpkin carving.  So instead the boyfriend bought me some flowers and I decided to turn my pumpkin into a vase. I can not believe how easy it was.

#1. Pick a perfectly balanced pumpkin that sits still.
#2. Cut out a decent round hole on top of the pumpkin & remove the innards.
#3. Add some water, then your flowers! 


The best thing about this project is that it can last all autumn long!

Cheers!

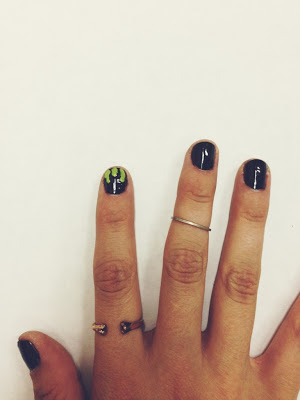
Finger Friday! D.I.Y Green Gooze


Halloween is leaving us so quickly! In fact this will be my last halloween nail tutorial.
This small nail project has been keeping me festive all month long, and i hope it has for
some of you as well. I thought I'd ask my boyfriend if he had any ideas to share with me
& yada yada yada I took it into consideration.

Supplies:

1. Black nail polish

2. Green nail polish

3. Toothpick or dotting tool

4. Top coat

Step one:
After painting your nails black (& making sure they are dry)

 you can then add 3 green dots. Make sure they are some what uneven. 
Step two: Begin working upwards, almost as if you are coloring
 in your nails and making sure you stay within the green dots
 you created in step one.

Step three: Make sure you fill in all the sides. Do steps 1-3 on each nail. & if you
want to give it a little bit more effect you can add a small green dot below the design. 


Step four: Add top coat to all your nails and your done!


Cheers!


Boo Bags


I believe piñatas work for any holiday. I mean who doesn't love a bag full of treats? 
Even better yet, a tree full of these. I keep dreaming about hanging them up for a halloween party. Wouldn't that be the sweetest? I would even love to put them up for the trick or treaters that pass by, but we all know they wouldn't just take one.

Supplies
1. Brown paper bag
2. Three sheets of orange construction paper

3. One sheet of black construction paper

4. Glue

5. Scissors 

6. Pencil

7. Green/Brown string or yarn

8. Candy (not shown in image)

9. Confetti/ Streamers (not shown in image)

Step one: Cut up orange strips that match the same size width of your brown bag
Step two: Fringe your strips!
Step three: Cover up that baggie!
Step four: Put a face on it!
Make it silly, make it scary, whatever you please.
 Grab the black construction paper, pencil and scissors. Draw out your design then cut it out 
Step five: Glue it onto your pumpkin bag 
Step six: STUFF IT. 
Step seven: Close your pumpkin up by folding the top three times.

 Then you need to add the stem, and you do this by stapling it in the middle
& your done! You can hang it, gift it, or just... keep it for yourself.

Cheers!
 Follow my blog with Bloglovin

Rainbow bread


Isn't this the most fantastic bread you've ever seen? I just can't get over it. If I was a kid and my mom made me sandwiches like this to take to school, I'd easily be thee coolest kid ever. & how fun would it be to actually make this bread at home!? I might give it a try one of these days. 


For my first rainbow sandwich I thought I would try something sweet and chocolatey. Mainly because I just can't imagine eating anything serious with it. A roast beef sandwich with havarti cheese? Too out of this world for me. Maybe by sandwich two ill be ready.


Friday Fingers // D.I.Y eyeball nails


Staying in passing out candy this year? 
Dressing up as some kind of dead zombie?
Or just feeling festive? (That's me)

Then I think these'll do the trick. 

 Supplies:

1. Black nail polish
2. Red striper nail polish (veins)
3. Blue nail polish 
4. White nail polish 
5. Top coat
6. Dotting tool

Steps:
1. Paint it white.
2. Dot it blue with the wand of your blue polish.
3. Use your red striper brush and paint Y's around the eyeball.
4. Add a black dot in the center 
5. Add a white dot towards the top of the black to give the eye a glare.
6. Top coat it and your done!

Happy friday!
                                                         Follow my blog with Bloglovin


Related Posts Plugin for WordPress, Blogger...
Back to Top
Pin It button on image hover