D.i.y Lemony lip scrub


Winters almost here & I'm stoked because I love everything about it, but I really could do without the chapped/cracked lips. Don't even think about cracking a smile, cause they literally will. So rather than buying myself a lip scrub I decided to make it. I love the way organic products feel, perhaps its the fact that I made it at home, but I really do feel a difference than store bought. Not only that but they are so simple to make at home. If you have a kitchen then you'll have the ingredients. 


Supplies

#1. A small container. 
I used a leftover product container.
#2. 1/4th tsp of Lemon or lime
#3. 3 tsp of white sugar or brown sugar 
#4. 3 tsp Unfiltered/Raw honey
#4. 1/4th tsp olive oil
#5. 15 minutes of your time

Step one: Add your honey and Suga. I used a chopstick to mix the ingredients because seeing as I am a klutz this is the safest alternative for me. In other words no mess. 


Step two: Now add the olive oil and lemon juice. If you find the lip scrub to be a little bit to liquidy, you can always add more sugar. 


When you apply this delicious edible lip scrub you will move your finger in a circular motion for about 1-2 minutes. You could either wipe it off with a damp washcloth or eat it all up. Remember that Keeping this lip scrub in the fridge will make it last longer (about two weeks). There you have it a lip scrub to fight against those nasty chapped lips.

Cheers!
 Instagram & RSS


Friday fingers /// D.i.y Strawberry nails


I know summer time is over, but I still like to have it at my finger tips. It makes the gloomy days brighter! Plus I just couldn't wait, the second the idea poped in my head I had to leap for it. For those of you that decide to try these delicious strawberrys, I just want to warn all you nail biting lip pickers to hold back on picking the seeds off. At first it feels glorious but then you'll look at what you've done and regret it. I don't recommend it.    

Supplies

#1. Top coat
#2. Green striper nail polish
#3. Red nail polish
#4. Gold microbeads
#5. Metal tool similar to toothpick
#6. Nail glue
#7. And 35 minutes of your time


Step one: Paint your nails with a red polish. I did two coats on mine.


Step two: With your striper green nail polish make stripes from down to up. Make some longer than others, as strawberry leaves aren't even. Which means you don't have to make them perfect!


Step three: Once you finish adding the leaves to all your nails begin to add your seeds! For this step you will need gold micro beads, nail glue, and a metal tool. Originally I used a tooth pick but the wood just absorbed the glue. 


Step four: Add a drop of nail glue onto a plastic surface. I used the lid of the nail glue and worked off there (p.s. this is still technically step three). First you will add small drops of glue where you'd like the seeds to be (In the photo above I place the dots of glue on my ring finger). Once the glue is on there begin to pick up the micro beads with the dotting tool. What makes this step easy is picking at the super glue first, that way the seeds latch on. Then apply one seed at a time! Continue this step until all your nails are done. **Remember you need to do this one nail at a time.


Step five: Once the nail glue is dry, you may now add your top coat.

Happy friday!

 Instagram & RSS


A few lovely label & packing links


I can not believe christmas is less than two weeks away! The only thing I have set are what gift tags and toppings I want to use. Other than that I am a mess. Also I would like to mention that today is the last repetitive day we will ever see. So happy 12/12/12 to all! Does any body have any crazy plans for the day? I wish I did, I got finals up the ying yang.


(All links are posted below low)

#1. Not so naughty Christmas gift label.
#2. Christmas cookie labels for santa!
#3. Teeny tiny boxes.
#4. Easy peasy gift bags for any time of the year.
#5. Printables for a dark xmas.
#6. Big ol POM POM toppings.


Cheers!
 Instagram & RSS


D.i.y Surprise ball


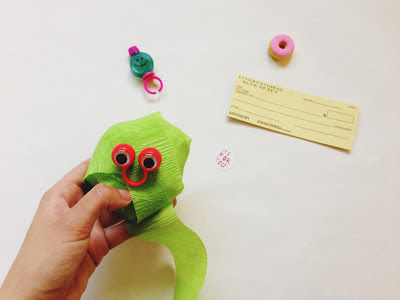
I love small and simple things; getting mail, high fives, making the yellow light and of course surprises. Ever since I ran into these surprise balls I've been hooked. I love that its packed with small meaningless items that mean everything in the world to you when you unravel them. The best part is how inexpensive they are to make! This particular bundle came out to $3 & all from party sections. Ah but the best best part is watching the reactions as they are being unravelled, its the sweetest thing.

supplies

#1. One streamer roll
#2. Eight or so simple/small goodies
#3. One sweeet sticker


Step one: Unravel your streamer and start with your first goodie!


Step two: Once you've wrapped up the first idem nice and tight, then
you move on to your second, then third, and so on.


Step three: Once all your items are wrapped into a ball, its time to 
add your special sticker to hold it all in place. There you have it, a small treat to give to a special someone. Its even perfect as a small stocking stuffer. 

Cheers!


D.i.y Christmas tree ( green tree )


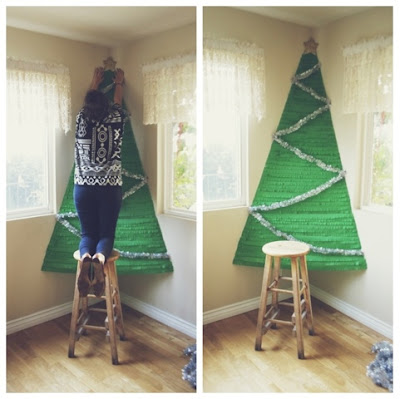
I've always loved the idea of making my own christmas tree. The process just looks like it would be a blast. But my family loves having a real tree for christmas, & who wouldn't? There's nothing like the smell of pine in your house. However, last year it didn't get done & christmas was a week away. I saw the offer and I immediately jumped on it. They ended up loving the way the tree came out, so this year the green tree came back! We all know this is an obvious way to save money. But just for kicks lets compare prices. Real tree about $80 Green tree about $3! Free is always better, or as close to it as possible.

Supplies for your very own green tree

#1. Two green streamers
#2. Painters tape
#3. Scotch tape
#4. Tinsel
#5. Three hours of your time


Step one: Find the very best corner in your house. Then working from top to bottom tape the width and height you'd like your tree to be! This is merely just to guide you.


Step two: Tape each layer of streamer onto the guided tape from left to right. Make sure that each layer is rather tight, so that your tree doesn't look all soggy and sad.


Step three: After taping the streamer you will fringe it from left to right. Lots of scissor work!!


Keep going! Till you each the tippy top!


Step four: Now its time to add the tinsel! For this part you simply need to tape it down with scotch tape and move along in a zig zag pattern. The really convenient part of this is that you don't have to cut it, making it really reusable when your cut down the tree!


Supplies for your golden star

#1. Gold glitter
#2. scissors
#3. Card stock (You can either hand draw your star or print it out)
#4. Spray adhesive 


Step one: Cut your star out.
Step two: Spray the adhesive 
Step three: Toss glitter all over star, make sure it is completely covered.
Step four: Let it sit to dry, then shake it out lightly outside so that your floors aren't covered in glitter.


Step five: Carefully add your star by taping the corners to the wall.


Step six: The absolute best part. Adding a trunk to your tree!


What I love the most about this tree is that its such an easy clean up & obviously super easy to maintain. I wanted to add christmas lights to it but... I kind of didn't want to be responsible for the house burning down. Maybe next year. Now all thats missing are the presents!

Cheers!

A few lovely Christmas links


One of my favorite things about the holidays are all the lovely ideas there are floating around on the inter-web. I love that everybody gets so crafty! Some even start ions before I realize its december & I salute you. Here are a few (more than usual) lovely links that im crushing on.

p.s. links are down below

#1. Brilliantly simple way to show off your holiday cards.
#2. Quick & easy printable advent calendar.
#3. Super lovely printable gift tags.
#4. Space saving, Advent in a jar!
#5. This totally economical advent calendar is the shit.
#6. Keep track with a December desktop calendar.


Cheers!


Related Posts Plugin for WordPress, Blogger...
Back to Top
Pin It button on image hover