D.i.y Friendship pencils


Friends rule & so do threaded bracelets. I use to rock em all the time, but they were so restricting. If I had to dress up I'd have to take them with me. So I figured adding some colorful embroidery thread would give me that summery feel with out that bracelet tan. Not only that but how sweet would these be to gift? An alternative to giving out those time consuming bracelets. 

Supplies

#1. Set of pencils
#2. Craft thread / embroidery
#3. Scissors 
#4. 10 minutes of your time


Step one: Choose 3 or four colors 

pictures to animation

Step two: Create a loop and slide onto the pencil. Next with the thread attached to the rest of the bunch, create the same loop and pull up to tighten (loop it under and back through the opening). Repeat until desired length.


Step three: Grab your next color of choice and begin of with the same starter knot. Then follow step twos loop sequence creating 5 knots.


Step four: Cut off the string from your first thread, and second (orange and magenta). Continue loop knotting with your second thread (magenta) until both cut strings are covered. Do steps 3-4 for each color of thread you add.


Step five: When ending your friendship pencil make a tight knot as close to the pencil as possible. Then create another one to secure it. Cut the thread & done!


Mix up your colors the more the better! Now you can have summer camp in your hands!
Also you could slide your design down and use it a finger grip! However I like it better as a topper.


Cheers!
 Instagram // RSS


Tea for two printable // Valentines Day


I wish coffee was my thing. I feel like those that drink it are always on a mission, and have got it all together. But coffee just isn't my thing. Hot chocolate & teas & really anything that sounds lazy, those things got my name written all over it. I decided changing up the tea labels would be a sweet gesture for valentines day. Something special but still completely easy & stress free. Downloads for the templates are in the supplies section. Enjoy!

Tea Tags:
-Hot stuff
-You warm my heart
-Your sweet
-You blow me away


Supplies:

#1. Scissors 
#2. Glue stick 
#3. Heart tea tags on card stock paper
#4. Tea bag envelopes on card stock paper
#5. Tea bags
#6. 15 minutes of your time
#7. Oh & this 


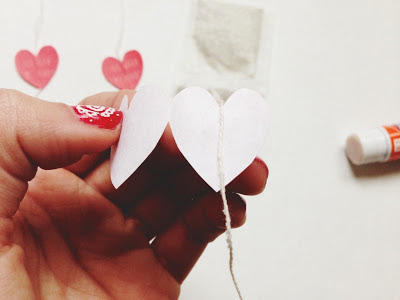
Step one: Once you cut out the heart tags, apply glue, and place string in the center.


Step two: Now its time to seal them up in an envelope! When you do so, glue the sides first then the top flap. I placed a book on top to keep the envelope from opening up. After two minutes or so the packet should be secure.


Step three: 
Gather up your tea packets & tie em up with some string. 


Or pour some hot water and share with your valentine.


Cheers!
 Instagram // RSS


Friday fingers // Bandana Nails


I've always admired the bandana pattern but have been intimidated to try it on my nails. Luckily it wasn't too terrifying, but I would recommend using Sally Hansons nail art pen. If you aren't satisfied you can easily wipe it off, making it one million times easier and less stressful. Also last reminder on the giveaway which can also be found below. I'll be emailing the winners tonight at 12:00am.

 Supplies

#1. Top coat
#2. Red polish // Essie's Russian Roulette //
#3. White nail art pen
#4. 40 minutes of your time


Step one: Paint your nails red & wait 6 mins for nails to dry.


Step two: In order to get the design, start off with a pear, Hersey kiss type of shape.


Step three: Then slowly make half circles around the shape until it is completely covered.


Step four: Fill in the middle of the design with the same pear shape however this time you will leave two circles in the middle. To give it some pizzaz I added dots. You can continue this design to the rest of your nails or try out different shapes.


Step five: To give it variety, paint a curved line across. Then outline it with the same half circle design that gives it that paper dolly look. Continue doing these steps with the rest of your nails. Mix up the designs! The following pictures are other designs I played with but they all are created by the previous steps.


Step six: Add top coat & done. Remember to add another coat the day after you manicures! That way they last longer.


Cheers!
 Instagram // RSS


A few lovely back to school links!


Although its technically not back to school season for everyone, I still wanted to share some treasures for those returning in the spring! I sometimes wish teachers would hand out a supply list rather than just books we need to order. They need to up their school game, make it a little brighter & fun. Meanwhile these links will have to do! For all you lucky's done with school, these links are also perfect for organizing your books and spiffying up your supplies!
 p.s. my giveaway is still going, so sign up ladies & gents.

(Links are down low)


#1. A super sweet design to get your things done!
#2. Quick & easy washi tape pencils.
#3. Dont forget your bookplates!
#4. Fill in the blanks with these bookplates.
#5. Sew your own pencil case for your pencils!
#6. Puuuurfect bookmarks & plates for all you kitty lovers.

(Not shown)

#7. My cheery pom pom bookmarks.
#8. My fabric notebook d.i.y.


Cheers!
 Instagram // RSS


Related Posts Plugin for WordPress, Blogger...
Back to Top
Pin It button on image hover