balloon

D.i.y Valentines day balloon card


Valentine's day is coming way to fast & even though I've prepared for it. I feel completely unprepared and lazy to do anything about it. I prefer hand making my cards than purchasing them. I feel the process is way funner than hunting for a card that last minute thats both personal and clever. The majority of the times I end up just grabbing any ol thing and just convince myself its the best thing ever. Well not this time.  


#1. One of the downloadable templates below


#2. Heart balloon
#3. Double sided tape


Step one: After cutting the card and folding it in half, place the heart balloon on top, and secure with double sided tape. You can either leave the balloon as is or blow it up and write a message for your loved one!


These heart balloons were a blast to play with. They look like kitties when I started blowing them up. I was so tempted to draw little faces on them but then I'd ruin the purpose of these templates. Any who head on over to Borondyspurpleplanet to enter her lovely valentines day giveaway! 


Cheers!
 Instagram // RSS


D.i.y Balloon on a stick


I've never really cared for those tiny silver balloon sticks that you buy at the market. Its probably because I like the way plastic balloons look. So I thought I would do a mixture of those balloons topped off with some ribbon. While shopping for balloons I ran into these fun smiley faced ones that I imagined would work perfectly for a birthday or to simply cheer someone up. So I grabbed a pack and got to work. Im warning you right now, this not the last time you'll be seeing these. My mind is overflowing with ideas on the different combinations that can be done.

Supplies

#1. Balloon
#2. Dowel 
#3. Two to three ribbons to mix and max
#4. Fifteen minutes of your time


Step one: Blow your balloon & knot it up!


Step two: Pick your ribbon! I stuck with a two color combo and made them long enough so that I could make a knot with the middle, rather than the ends.


Step three: In order to gain control of my balloon, I decided to tape it to the dowel. Don't worry it'll be covered once you add the ribbon around it.


Step four: Tie the ribbon tight so that the balloon stand up nice & tall. I absolutely loved the way it looked once it was done, it was fun and definitely a quick surprise to give to a friend. 


Cheers!
 Instagram & RSS


D.i.y Ice balls


About a couple of days ago, I ran into these rad sphere ice cubes. I immediately fell hard. But the idea of waiting for the mail man didn't settle well with me. So instead I thought id make my own. Theres just something about these that put a huge smile on my face. My mind just cant stop thinking of all the possibilities. I mean how amazing would a huge metal beverage tin filled with these be?? So much funner than regular ol ice cubes. Or even a glass of whiskey on the "rock"I would drink that all up. This was my first batch, but most certainly not my last. Im pretty sure Im going to have these in my freezer on a daily basis. Such a simple way to put a smile on your face, at least for me that is.


Step one: Get yourself some regular sized balloons. If you use water balloons 
they're more likely to pop in the freezer because they're thinner.


Step two: Fill up the balloons! I used my filtered water 
faucet since the spout is thin and well... filtered.

Step three: Place your tied up water balloons into the freezer. Give them 6 hours
 or so to completely freeze. Don't make the mistake of checking and
 poking them every hour. I couldn't wait & ended up popping one of them.


Step four: Cut the plastic off your ice cubes, pour into a glass or pitcher and serve!
Next time I will be sure to add some mint or slices of citrus!
As for now delicious cucumber water will do.


Cheers!


D.I.Y balloon birthday card


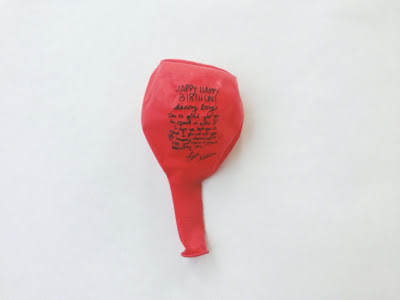
I dont know about you, but I'm completely head over heels for balloons. I'm the kind of girl that prefers balloons over flowers... I know... I know.  Not much of a girl am I. But they're just so fun and happy. When have you seen someone sad with a balloon on a string? Exactly. What I love most about this card, aside that it has a balloon on it, and that its a perfect way to share germs. Is that the birthday girl/boy has to blow it up in order to clearly read their message. In other words, it's got fun written all over it. 


Supplies

#1. One regular sized balloon
#2. Tape
#3. Card and envelope. I purchased these at target in the
 stationary section. Totally legitimizes a card // Or download my template!
#4. Pen
#5. Black marker


Step one: Once you pick what color balloon you want to use, blow it up! I would say not to big.

Step two: What you have to do now is hold it at a good angle so that you can write on it without releasing air. This part can get kind of tricky, and uses lots of wrist muscles.


Step three: Once you finish writing your birthday message, wait a minute or two so that it can completely dry. Then slowly release the air and set aside for 6 mins. This is the fun part. Your huge message has now shrunk into the tiniest writing possible!


Step four: As you wait for the balloon to dry, you can begin to write your message. I wrote "GETTING OLD BLOWS". The other one I like to use is "BLOW ME". That one always cracks a smile!


Step five: When your balloon is completely dry, close your card and place a piece of tape that is formed into a loop or double sided tape. Place a pen inside the balloon and move it around, to make sure you get your balloon nice and stuck.


There you have it a simple & sweet birthday card!


Oh, and be careful not to write to hard. You'll get the scare of your life. & If you decide to make one I would love to hear of some other phrases that you wrote, so please do share!


Cheers!

Related Posts Plugin for WordPress, Blogger...
Back to Top
Pin It button on image hover