card

A knotty Valentines day card


I'm aware Valentines day is a month away but I just cant help & get a head start. Especially when I figured out a way to incorporate this save the date card that I've been eying. The timing couldn't have been more perfect. This would even be perfect as an anniversary card! Anything romantic really.


Supplies

1. My PDF printable 
2. Scissors 
3. 9 inches of twine 
4. Exacto or cutting tool
5. Glue stick
5. 15 minutes of your time


Step one: After cutting out the PDF and carefully folding it in half, make a hole through the two sheets using your cutting tool. After doing so glue the two sheets together.


Step two: Place the twine through and make a knot. 


Step three: Before doing the same to the other side, make a loose knot in the middle of the card.


Make sure when you give your card to your valentine that the knot in the middle is loose. That way when they open it up it will form the knot. Click on the download bar below to make your own!


Cheers!
 Instagram & RSS


D.I.Y balloon birthday card


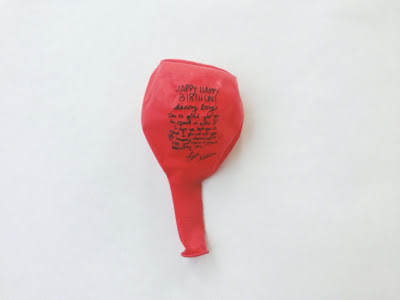
I dont know about you, but I'm completely head over heels for balloons. I'm the kind of girl that prefers balloons over flowers... I know... I know.  Not much of a girl am I. But they're just so fun and happy. When have you seen someone sad with a balloon on a string? Exactly. What I love most about this card, aside that it has a balloon on it, and that its a perfect way to share germs. Is that the birthday girl/boy has to blow it up in order to clearly read their message. In other words, it's got fun written all over it. 


Supplies

#1. One regular sized balloon
#2. Tape
#3. Card and envelope. I purchased these at target in the
 stationary section. Totally legitimizes a card // Or download my template!
#4. Pen
#5. Black marker


Step one: Once you pick what color balloon you want to use, blow it up! I would say not to big.

Step two: What you have to do now is hold it at a good angle so that you can write on it without releasing air. This part can get kind of tricky, and uses lots of wrist muscles.


Step three: Once you finish writing your birthday message, wait a minute or two so that it can completely dry. Then slowly release the air and set aside for 6 mins. This is the fun part. Your huge message has now shrunk into the tiniest writing possible!


Step four: As you wait for the balloon to dry, you can begin to write your message. I wrote "GETTING OLD BLOWS". The other one I like to use is "BLOW ME". That one always cracks a smile!


Step five: When your balloon is completely dry, close your card and place a piece of tape that is formed into a loop or double sided tape. Place a pen inside the balloon and move it around, to make sure you get your balloon nice and stuck.


There you have it a simple & sweet birthday card!


Oh, and be careful not to write to hard. You'll get the scare of your life. & If you decide to make one I would love to hear of some other phrases that you wrote, so please do share!


Cheers!

Related Posts Plugin for WordPress, Blogger...
Back to Top
Pin It button on image hover