project

Christmas Car


Now a days its hard to find the time to put christmas lights on the house. At least for my family, if my dad doesn't do it no one will & poor papa is always tired. So, a couple of years ago I decided to take christmas around with me. I must say ever since I started this tradition its made my holidays all the more cheerful, even without the lights on our house. I feel that a car driving around with lights is much more special and silly. I love seeing the expressions of little faces looking up at my car, adults cracking a smile, and cars honking and waving. It makes everyone so much friendlier.

Here what you'll need:
#1. A car with a rack
#2. One or two 100 count color lights
I purchased mine at Rit-Aid.


Once you plug in your adaptor connect your lights and test them out. Then look for an opening or window where you can pass the lights through. My car has a hinged window, seriously the only time I actually appreciate them.


Once your all done, you can either zip tie them so they are nice and secure. Or simply just tie the end together with the rest of the lights. Now its just time to wait for the sun to go away & light up!


Did I mention that it makes following your car so much easier? 
Your friends can spot ya a mile away. Not sure if thats a good thing though.

Cheers

D.I.Y Fabric notebooks


I dont know about you, but I've always had a love for school supplies. Doesnt matter the time of the year, a new notebook or set of new inky pens just makes me the happiest. But what to do with those old left over notebooks? The old ones that have lost its shine. Well, make them brand new again!


supplies:

#1. Old composition notebook


#2. Fabric. This is the perfect time to use any

left overs you have laying around

#3. Scissors


#4. Spray glue


Step one: Trim the side of the fabric you are going to use.


Step two: This is were things get messy. Spray the notebook with spray glue

but make sure you don't get it on the black portion of your notebook (black tape).
In other words only spray the pattern of the notebook.


Step three: Your going to want to work fast. Start by making sure the fabric is aligned

with the border of the notebook (black tape that holds it together). Then smooth out
the rest of the notebook, making sure all the wrinkles are pressed out.

Step four: Now that the fabric is attached to the notebook, its time to cut off the

fabric. What you need to do here is trace along the sides of the notebook.


Step five: Do the same to the other side. Wait for it to dry, and voila
you've got yourself a brand new notebook!

Cheers!


D.I.Y balloon birthday card


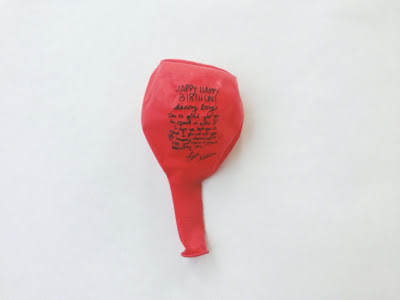
I dont know about you, but I'm completely head over heels for balloons. I'm the kind of girl that prefers balloons over flowers... I know... I know.  Not much of a girl am I. But they're just so fun and happy. When have you seen someone sad with a balloon on a string? Exactly. What I love most about this card, aside that it has a balloon on it, and that its a perfect way to share germs. Is that the birthday girl/boy has to blow it up in order to clearly read their message. In other words, it's got fun written all over it. 


Supplies

#1. One regular sized balloon
#2. Tape
#3. Card and envelope. I purchased these at target in the
 stationary section. Totally legitimizes a card // Or download my template!
#4. Pen
#5. Black marker


Step one: Once you pick what color balloon you want to use, blow it up! I would say not to big.

Step two: What you have to do now is hold it at a good angle so that you can write on it without releasing air. This part can get kind of tricky, and uses lots of wrist muscles.


Step three: Once you finish writing your birthday message, wait a minute or two so that it can completely dry. Then slowly release the air and set aside for 6 mins. This is the fun part. Your huge message has now shrunk into the tiniest writing possible!


Step four: As you wait for the balloon to dry, you can begin to write your message. I wrote "GETTING OLD BLOWS". The other one I like to use is "BLOW ME". That one always cracks a smile!


Step five: When your balloon is completely dry, close your card and place a piece of tape that is formed into a loop or double sided tape. Place a pen inside the balloon and move it around, to make sure you get your balloon nice and stuck.


There you have it a simple & sweet birthday card!


Oh, and be careful not to write to hard. You'll get the scare of your life. & If you decide to make one I would love to hear of some other phrases that you wrote, so please do share!


Cheers!

Related Posts Plugin for WordPress, Blogger...
Back to Top
Pin It button on image hover