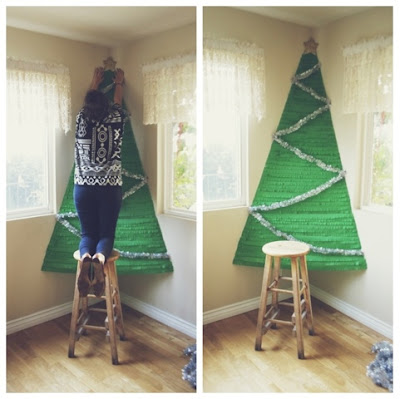
I've always loved the idea of making my own christmas tree. The process just looks like it would be a blast. But my family loves having a real tree for christmas, & who wouldn't? There's nothing like the smell of pine in your house. However, last year it didn't get done & christmas was a week away. I saw the offer and I immediately jumped on it. They ended up loving the way the tree came out, so this year the green tree came back! We all know this is an obvious way to save money. But just for kicks lets compare prices. Real tree about $80 Green tree about $3! Free is always better, or as close to it as possible.
Supplies for your very own green tree
#1. Two green streamers
#2. Painters tape
#3. Scotch tape
#4. Tinsel
#5. Three hours of your time
Step one: Find the very best corner in your house. Then working from top to bottom tape the width and height you'd like your tree to be! This is merely just to guide you.
Step two: Tape each layer of streamer onto the guided tape from left to right. Make sure that each layer is rather tight, so that your tree doesn't look all soggy and sad.
Step three: After taping the streamer you will fringe it from left to right. Lots of scissor work!!
Keep going! Till you each the tippy top!
Step four: Now its time to add the tinsel! For this part you simply need to tape it down with scotch tape and move along in a zig zag pattern. The really convenient part of this is that you don't have to cut it, making it really reusable when your cut down the tree!
Supplies for your golden star
#1. Gold glitter
#2. scissors
#3. Card stock (You can either hand draw your star or print it out)
#4. Spray adhesive
Step one: Cut your star out.
Step two: Spray the adhesive
Step three: Toss glitter all over star, make sure it is completely covered.
Step four: Let it sit to dry, then shake it out lightly outside so that your floors aren't covered in glitter.
Step five: Carefully add your star by taping the corners to the wall.
Step six: The absolute best part. Adding a trunk to your tree!
What I love the most about this tree is that its such an easy clean up & obviously super easy to maintain. I wanted to add christmas lights to it but... I kind of didn't want to be responsible for the house burning down. Maybe next year. Now all thats missing are the presents!
Cheers!


Wow. I have to repeat that...WOW! This is such a great idea!! It's so easy?!?!?!?! I'm so impressed. I have to pin this on pinterest because I am in awe! Love it, thanks for sharing!
ReplyDeleteErgo - Blog
Ah thanks chloe! Much appreciated!! Also yes it really is incredibly easy, just reallllly tedious. But seriously worth it cause its so fun! Have a great weekend lady.
DeleteMelissa
Love this!! It is such a lovely alternative to a traditional tree. How creative! xx. McKenna Lou
ReplyDeleteThis is the best and the most creative DIY I've seen this season. Brilliant, girl! :)
ReplyDeleteYou just made my weekend! Thank you girlie.
DeleteMelissa
What a cute idea! It looks really wonderful!
ReplyDeleteLove it! I'm thinking about doing it at my home.
ReplyDeleteAw so cute and what a great idea! I don't have room in my apartment for a full tree but maybe I'll try a mini version of this!
ReplyDeleteOh my gosh! I've never seen this before. Such a cool idea!!
ReplyDeleteHi Melissa. That's so cool.
ReplyDeleteThat is so adorable, and so smart!
ReplyDeleteI love your tree! I think this would be great in places where you can't actually have a live tree too, like the corner of your cube at work or a teacher's classroom or something. Awesome. :)
ReplyDeleteI love it!!! It looks great! You will have to do an update photo when the presents are all under there :) :)
ReplyDeleteI love this idea so simple and awesome!
ReplyDeletehttp://floatingthrufields.blogspot.com/
This is so cute! My son would blast though this like the winner at the end of the race, but that could be fun, too! ;D
ReplyDeleteI just made a paper fireplace that would look sweet next to your tree!
ReplyDeletehttp://makinglittleadventures.blogspot.com/2012/12/paper-fireplace.html
the idear very good
ReplyDeleteYou need to invest in some Martha Stewart fringing scissors, dear!
ReplyDelete