nailart

Friday fingers // Marbleized nails


I've always been mesmerized by marbles, oh the mixture of the twirls and swirls inside of them are just perfect. Each one is different and unique, just like these nails. So get yourself to the kitchen because im sure all of you have the supplies needed! Also I'd like to apologize for my funky nails. I chipped a couple while rock climbing. I must say, ever since I started its been hard to keep a steady relationship with my nails. Sometimes it just seems pointless, but atlas I find myself doing it either way. Anyways here is three quick and easy steps to get your nails looking "marbleous".

Materials

#1. Dark nail polish (I used a dark purple)
#2. A grayish polish
#3. Top coat
#4. Plastic wrap


Step one: Paint your nails with your dark polish. This will be your base coat.


Step two: Once your nails are 100% dry, it is time to coat your nails with the gray polish (literally paint over the base coat). You will need to work fast while doing this, and one nail at a time. The second you paint your nail grab your plastic wrap, crumple it up, and dab your nail until you get the desired pattern.


Step three: Top coat it up & done!

Cheers
Hope you enjoy your weekend!


Friday fingers /// D.i.y finger fuzz


Friday is here & I couldn't be happier! The weather is finally acting its age.
Here in L.A. we'll be having a whole weekend of rain & that gets me all warm and fuzzy.
Which is why Im sharing my pink fuzzy nails today. These are my go to for a quick, fun, and 
easy manicure. You really hardly need anything for these pups! But I just want to warn
 you, they tend to get dirty pretty easily so beware. Sadly that means finger foods are a no no. 
Other than that, they are a blast to have and are totally unique!


Supplies:

#1. Pink velvet fuzz (crushed velvet)
You could either order it, or find it at Joann.

#2. Essie A Crewed Interest or a soft pink

#3. Tweezers


Step one: First things first, apply one coat of nail polish. Whats great
about this step is you can be as sloppy as you want since the
 pink fuzz will cover most of your errors!


Step two: This is were you'll work fast. Apply your second coat of nail polish.
Then with the tweezers apply the pink fuzz on top of the wet polish. Once
 your little pink fuzz of a mountain is sitting on top, your going to squash it 
down with your finger. Making sure you cover your whole nail.


Step three:  Once you finish, there will be alot of fuzz left over on your fingers.
To fix that your simply just going to blow it off till its nice and clean! Each and everyone of them.


& There you have it, a hand full of pink fuzzy nails!

Cheers!
Follow my blog with Bloglovin

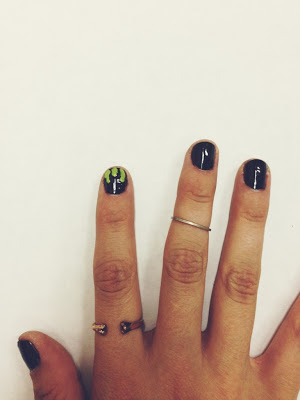
Finger Friday! D.I.Y Green Gooze


Halloween is leaving us so quickly! In fact this will be my last halloween nail tutorial.
This small nail project has been keeping me festive all month long, and i hope it has for
some of you as well. I thought I'd ask my boyfriend if he had any ideas to share with me
& yada yada yada I took it into consideration.

Supplies:

1. Black nail polish

2. Green nail polish

3. Toothpick or dotting tool

4. Top coat

Step one:
After painting your nails black (& making sure they are dry)

 you can then add 3 green dots. Make sure they are some what uneven. 
Step two: Begin working upwards, almost as if you are coloring
 in your nails and making sure you stay within the green dots
 you created in step one.

Step three: Make sure you fill in all the sides. Do steps 1-3 on each nail. & if you
want to give it a little bit more effect you can add a small green dot below the design. 


Step four: Add top coat to all your nails and your done!


Cheers!


Friday Fingers // D.I.Y eyeball nails


Staying in passing out candy this year? 
Dressing up as some kind of dead zombie?
Or just feeling festive? (That's me)

Then I think these'll do the trick. 

 Supplies:

1. Black nail polish
2. Red striper nail polish (veins)
3. Blue nail polish 
4. White nail polish 
5. Top coat
6. Dotting tool

Steps:
1. Paint it white.
2. Dot it blue with the wand of your blue polish.
3. Use your red striper brush and paint Y's around the eyeball.
4. Add a black dot in the center 
5. Add a white dot towards the top of the black to give the eye a glare.
6. Top coat it and your done!

Happy friday!
                                                         Follow my blog with Bloglovin


Friday fingers // D.I.Y Candy Corn nails


I woke up feeling quite corny this morning, from my fingers to my toes. 
I can't believe how close halloween is getting. There is so much that 
needs to be done, and Im not the slightest bit ready! Well, 10 fingers ready.

Read More >>

D.I.Y drippy nails

These nails are perfect for the summer! & there are so mannnny combination of colors you could do.


1. base coat
2. I used sally hansen extreme mint sorbet
3. Then i added a quick dry coat (cause im a klutz)
4. In order to get the effect, i made sure the wand was thick of polish. Then i added three dots of a cotton candy type of pink and worked my way up. You could do different pattern of drips, from high to low, etc.
5. You can also add a small drip towards the middle of the nail to give it even more of a drippy trippy effect.
6. top coat! and viola!


D.I.Y Ikat nails!


Oh the ever so sweet ikat print! These have got to be one of my favorite nail designs out there, and they're relatively easy! all you need is a wee bit of patience.

#1. start with your base color (sally hansen mint sorbet OR orly gum drop)
#2. apply orange splotches. Make sure that it drys!
#3. Add white in the middle of those orange blobs. Your basically going to be layering at this point.
#4. Outline the blobs with a black nail polish or polish pen. Make some parts a bit jagged to give it that Ikat effect.
#5. When you feel that its dry, you can finally add the "Eye" to your design.
#6. Add a wonderful top coat. and Voila!


Follow my blog with Bloglovin

Related Posts Plugin for WordPress, Blogger...
Back to Top
Pin It button on image hover