November 2012

Friday fingers // Marbleized nails


I've always been mesmerized by marbles, oh the mixture of the twirls and swirls inside of them are just perfect. Each one is different and unique, just like these nails. So get yourself to the kitchen because im sure all of you have the supplies needed! Also I'd like to apologize for my funky nails. I chipped a couple while rock climbing. I must say, ever since I started its been hard to keep a steady relationship with my nails. Sometimes it just seems pointless, but atlas I find myself doing it either way. Anyways here is three quick and easy steps to get your nails looking "marbleous".

Materials

#1. Dark nail polish (I used a dark purple)
#2. A grayish polish
#3. Top coat
#4. Plastic wrap


Step one: Paint your nails with your dark polish. This will be your base coat.


Step two: Once your nails are 100% dry, it is time to coat your nails with the gray polish (literally paint over the base coat). You will need to work fast while doing this, and one nail at a time. The second you paint your nail grab your plastic wrap, crumple it up, and dab your nail until you get the desired pattern.


Step three: Top coat it up & done!

Cheers
Hope you enjoy your weekend!


D.i.y Ice balls


About a couple of days ago, I ran into these rad sphere ice cubes. I immediately fell hard. But the idea of waiting for the mail man didn't settle well with me. So instead I thought id make my own. Theres just something about these that put a huge smile on my face. My mind just cant stop thinking of all the possibilities. I mean how amazing would a huge metal beverage tin filled with these be?? So much funner than regular ol ice cubes. Or even a glass of whiskey on the "rock"I would drink that all up. This was my first batch, but most certainly not my last. Im pretty sure Im going to have these in my freezer on a daily basis. Such a simple way to put a smile on your face, at least for me that is.


Step one: Get yourself some regular sized balloons. If you use water balloons 
they're more likely to pop in the freezer because they're thinner.


Step two: Fill up the balloons! I used my filtered water 
faucet since the spout is thin and well... filtered.

Step three: Place your tied up water balloons into the freezer. Give them 6 hours
 or so to completely freeze. Don't make the mistake of checking and
 poking them every hour. I couldn't wait & ended up popping one of them.


Step four: Cut the plastic off your ice cubes, pour into a glass or pitcher and serve!
Next time I will be sure to add some mint or slices of citrus!
As for now delicious cucumber water will do.


Cheers!


A few lovely thanksgiving links


#1. Perfect for leftover pieces of pie!
#2. Fun handmade turkey.
#3. Lovely printable thank you cards.


I hope you all have the loveliest of thanksgivings!
Cheers!


D.I.Y Honey face mask


Lately I've been completely obsessed with natural products, home remedies, and really anything organic. Im that person that has tried everything and saw little or really no results. But since I've changed my face regimen its really improved my crappy skin. When it comes down to face masks this is my go to! Super easy and perfect for those still undergoing puberty (pimples). Seriously, when does it end? Also please, before you try this mask make sure that your skin isn't allergic to honey. 
Alright! Its time to get au-naturel. 


Supplies:

#1. Container for your mask

#2. One teaspoon of Nutmeg


#3. One teaspoon of Cinnamon


#4. Two tablespoon of Unfiltered/Raw honey


Things you should know:
- You can use the face mask 2-3 times a week.
-You get better results when applying on after a shower.
- Wear a shirt you don't care dirtying 


Step one: Pour honey into container


Step two: Add nutmeg and cinnamon


Step three: Stir  all of the ingredients until it has gone from chalky to gooey.
 I personally like using a chopstick for this step. I find that whenever I use a spoon
 I make a bigger mess.


Step four: You dont even have to wait! You can use it this second. Make sure that
 you apply the mask to a clean and patient face because you will be leaving this 
mask on for 30 minutes. I love applying this right before i shower. It saves me time
 having to wash it off over the sink, and then have to clean the sink.

Cheers!

D.i.y emergency kit


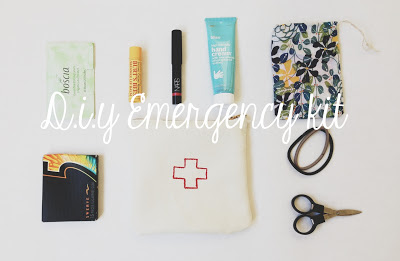
Im the type of person that likes to have everything with me, you know... just in case. But throwing everything into my purse isn't very practical, especially when I need it. Everything just gets lost in the mess and I end up having to jiggle my junk out (I hope that made somebody giggle). In other words, complete waste of time. So I decided to make an emergency kit for my personal belongings. 

In my kit I carry
1.Boscia blotting wipes, which is a quick fix to an oily face.
2. Burt's bee's Chapstick
3. NARS new lover lip pencil, to give me a nice reddish hue on the go.
4. Bliss hand cream, which smells absolutely lovely! 
5. A small drawstring bag which I carry my ahem things.. girly things. 
Which I must say is the reason I have an emergency kit to begin with.
6. Some gum, which is always a must.
7. Two hair ties for a quick bun.
8. A small pair of portable scissors. As weird as it is to carry these around, 
you will not regret it. Or at least I don't. I find myself needing scissors quite 
often when im not home.


Supplies:


#1. Two pieces of canvas cut the the size you'd like your kit to be.
 Remember to add 1/2 extra on each side (seam allowance)

#2. Pins to hold fabric in place

#3. One zipper that measures the size of your pouch.
 I made mine according to the size of the zipper.

#4. Red fabric paint

#5. Fabric pen. Totally optional, I use it because
it makes my life easier.

#6. scissors

Step one: Paint your red cross on your already cut piece of canvas.
 Now its time to play the waiting game. Continue onto step two when dry.


Step two: Pin the fabric down to the zipper and
 hand sew, or use the sewing machine. 

Step three: Place the two fabrics together and sew the sides and bottom.
 Make sure your pattern is sandwiched between the two fabrics. In other 
words the part you want to be outside should be inside when sewing.

Step four: Reverse your already sewed pouch


Step five: Stuff it with your belongings! 

D.i.y pizza cookie


There are many things I enjoy in this world. Two of which are chocolate 
and pizza. So I thought I'd combine the two! Plus Im personally not a cake person.
 Don't get me wrong, they're beautiful I just prefer the taste of a warm cookie or brownie. 

Naturally (for me) this the perfect alternative & would be a blast to do with kids. This particular pie was for a birthday girl, whom was pleasantly surprised to see a huge cookie in a pizza box! Now if your thinking this is just too much chocolate, you can easily substitute the nutella for some strawberry/raspberry preserves. I actually kept fighting with myself on what to use for the "pizza sauce". I knew some sort of fruit preserve would look much more like a pizza, but my sweet tooth couldn't deny nutella. 

Supplies:

#1. Two packets of chocolate chip cookie dough

#2. Nutella

#3. Four mini packets of M&Ms 

#4. Shaved coconut


Step one: Let your two packets of cookie dough thaw, that you can easily 
form a ball with the dough.


Step two: Spread your cookie dough on a pizza pan (I added grease, but 
its not necessary). Don't forget to create a "crust" around the edges 
when kneading the dough. When your ready to place it in the oven make 
sure you follow the cookie dough instructions. When you remove the 
pizza from the oven let it cool for about 20 minutes or until the dough has cooled. 


Step three: Spread nutella in a circular motion. 
Make sure to leave an inch around without nutella.


Step four: Now is the time to make your pizza slices. If you wait till
the end the cookie will harden, making it impossible to cut the cookie
without breaking it.


Step five: Add your pepperoni (Chocolate M&Ms). I tried to make sure each slice had 
a mixture of colors and kept the doubles to a minimum.


Step six: Add the cheese (shredded coconut)! This was my favorite part. 
I loved spreading the cheese just like I would for a pizza.


Step seven: & now for the Pièce de résistance. 
             A pizza box for your pizza cookie!


Step eight: Deliver your pizza pie to a special friend! 
            Or have yourself a pizza night with a side of ice cream!


Friday fingers /// D.i.y finger fuzz


Friday is here & I couldn't be happier! The weather is finally acting its age.
Here in L.A. we'll be having a whole weekend of rain & that gets me all warm and fuzzy.
Which is why Im sharing my pink fuzzy nails today. These are my go to for a quick, fun, and 
easy manicure. You really hardly need anything for these pups! But I just want to warn
 you, they tend to get dirty pretty easily so beware. Sadly that means finger foods are a no no. 
Other than that, they are a blast to have and are totally unique!


Supplies:

#1. Pink velvet fuzz (crushed velvet)
You could either order it, or find it at Joann.

#2. Essie A Crewed Interest or a soft pink

#3. Tweezers


Step one: First things first, apply one coat of nail polish. Whats great
about this step is you can be as sloppy as you want since the
 pink fuzz will cover most of your errors!


Step two: This is were you'll work fast. Apply your second coat of nail polish.
Then with the tweezers apply the pink fuzz on top of the wet polish. Once
 your little pink fuzz of a mountain is sitting on top, your going to squash it 
down with your finger. Making sure you cover your whole nail.


Step three:  Once you finish, there will be alot of fuzz left over on your fingers.
To fix that your simply just going to blow it off till its nice and clean! Each and everyone of them.


& There you have it, a hand full of pink fuzzy nails!

Cheers!
Follow my blog with Bloglovin

A few lovely links for November


#1. Lovely printable chocolate wrappers
#2. A fantastic and totally acceptable way to play with your food 
#3. Super thankful for this printable

Follow my blog with Bloglovin

Related Posts Plugin for WordPress, Blogger...
Back to Top
Pin It button on image hover